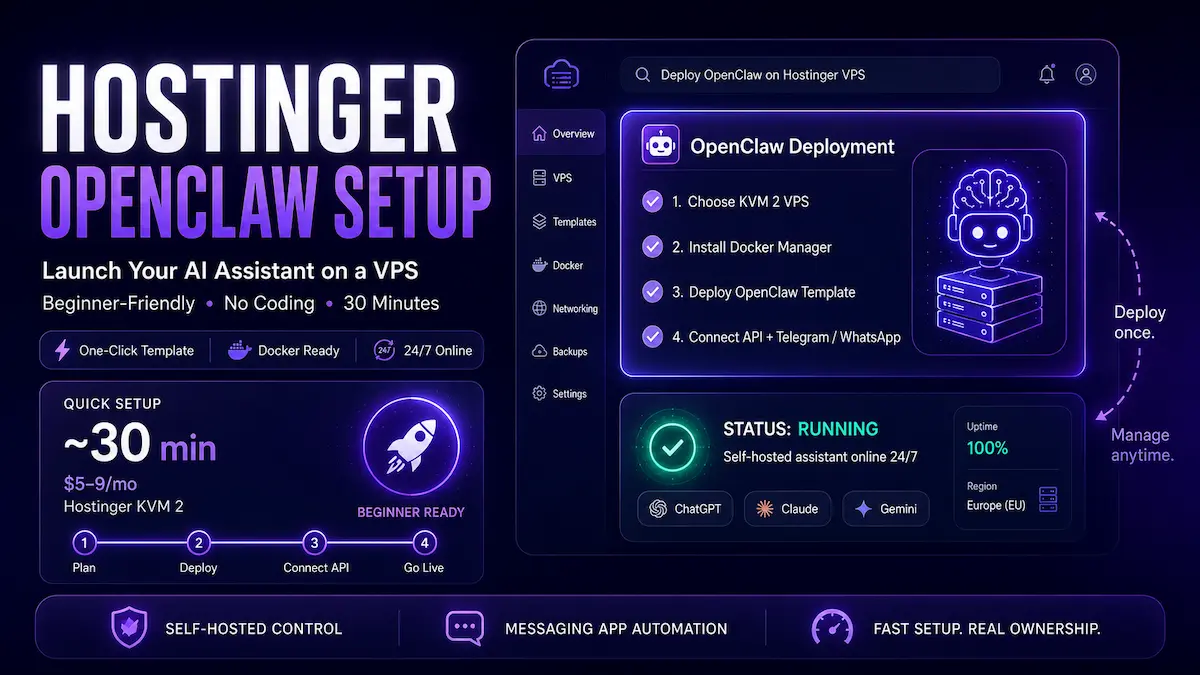
QUICK VERDICT — HOSTINGER OPENCLAW SETUP 2026
~30
minutes to set up
$5–9/month
Hostinger KVM 2
No Coding
beginner friendly
What You Will Build: A self-hosted AI assistant running 24/7 on a Hostinger VPS — connected to Telegram or WhatsApp and powered by ChatGPT, Claude, or Gemini. No server goes to sleep. No laptop needs to stay on.
What You Need: A Hostinger account, an API key from OpenAI, Anthropic, or Gemini (or Nexos AI credits from Hostinger), and about 30 minutes of focused time.
Honest Verdict: The Hostinger one-click OpenClaw template is one of the most beginner-friendly self-hosted AI setups I have tried. What used to take hours of terminal work now takes less time than a lunch break — if you follow the steps in order.
→ Get Started: Hostinger OpenClaw VPS PlansPlans from $5/month · One-click OpenClaw template · 30-day money-back guarantee
I’ll be honest — when I first heard about OpenClaw, I rolled my eyes a little.
Another “AI assistant” tool. Another thing to configure. Another thing to break at 11pm when I just want to go to bed.
But here’s the thing. I spent a weekend working through the Hostinger OpenClaw setup on a KVM 2 VPS, and it surprised me. Not because it’s magic — it’s not — but because the process was genuinely simpler than I expected. No deep terminal work. No hunting Stack Overflow. No calling a developer friend.
If you landed here looking for a Hostinger OpenClaw setup guide, you’re probably wondering the same thing I was: can a non-technical person actually get this running? The honest answer is yes — and I’m going to show you exactly how, step by step.
Before You Start — The Realistic Picture
What Is OpenClaw? (And Why Does It Need a VPS?)
OpenClaw used to be called Moltbot. Before that, Clawdbot. The name has changed a few times, but the idea has stayed the same: it’s a self-hosted AI assistant that lives on a server and talks to you through the messaging apps you already use — Telegram, WhatsApp, Slack, Discord, and a dozen others.
You give it an AI model to use (OpenAI’s GPT, Anthropic’s Claude, Google’s Gemini — your choice), and it becomes a personal assistant that can schedule tasks, automate workflows, answer questions, and execute actions — all through plain conversation.
Now, why a VPS? Simple. If you install OpenClaw on your laptop, it goes offline the moment you close the lid. A VPS is essentially a small computer that lives in a data center and never turns off. Your assistant stays available 24/7 even when you’re asleep or your internet goes down. Think of it as renting an always-on computer for about the cost of a Netflix subscription.
Hostinger offers a one-click OpenClaw template that cuts what used to be a multi-hour manual install down to something a beginner can finish before lunch. That one-click template is what makes this particular Hostinger OpenClaw setup worth doing over self-configuring a blank server.
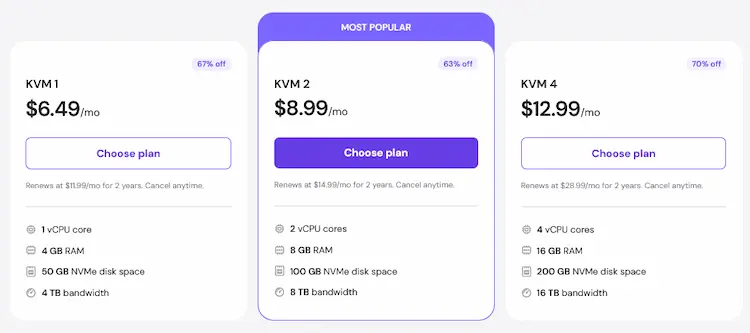
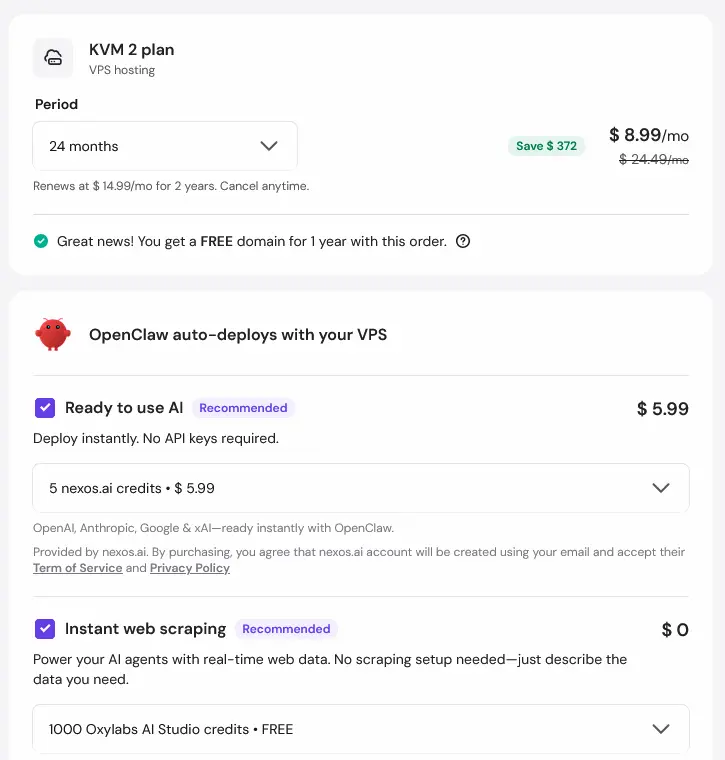
Step 1: Pick the Right Hostinger VPS Plan for Your OpenClaw Setup
The plan you choose matters more than people realize. OpenClaw runs inside Docker containers — essentially mini-programs inside your server — and if your server doesn’t have enough resources, things get sluggish fast.
For most people reading this, the KVM 2 plan is the right call. It has enough CPU and RAM to run OpenClaw comfortably, handle multiple messaging channels, and not break a sweat during normal use. If you’re planning to run several bots simultaneously or use OpenClaw’s browser automation features heavily, step up to KVM 4. But for getting started? KVM 2 is plenty.
One more thing while you’re on the plan page: you’ll see an option to add Nexos AI credits for $5. If you don’t already have API keys from OpenAI or Anthropic, grab this. It gives you immediate access to AI models without creating separate external accounts — saves a frustrating detour later.
On billing period — the 24-month plan has the lowest monthly rate. If you’re committed long-term, it’s the smart pick. If you want to test first, monthly works fine.
Plans from $5/month · 30-day money-back guarantee
Step 2: Complete Your Purchase and Lock In the OpenClaw Template
Here’s where Hostinger’s setup earns its keep.
During checkout, you’ll reach a screen asking you to choose an application template. Find OpenClaw on VPS in that list — if you came from Hostinger’s dedicated OpenClaw page, it should already be selected. If not, just search for it in the catalog.
Also on this screen: the Nexos AI credits add-on and Oxylabs credits, which adds web search capability to your assistant. Both are optional. Neither is essential to get started.
Finish the purchase. You’ll land in your hPanel dashboard — that’s Hostinger’s control panel, where you’ll be spending the next 25 minutes completing the rest of the Hostinger OpenClaw setup.
Step 3: Configure Your VPS — Location, OS, and Backups
After purchasing, click Setup in your hPanel to start configuring the VPS. Three decisions here, and each one matters.
Server Location
Pick the region closest to where you physically are. Hostinger’s system usually auto-suggests the lowest-latency option — I’d trust that default. The closer the server to you, the snappier your assistant’s responses feel. I’m in Southeast Asia, so I stuck with the suggested server region rather than picking somewhere that sounded cooler.
Operating System
Go with Ubuntu 24.04 LTS. It has the longest support window of any current option, it’s the most stable, and it’s what OpenClaw’s Docker template is optimized for. Don’t overthink this one.
Daily Auto Backups
Turn this on. I’m going to say it louder: turn this on. OpenClaw can modify its own server environment — install new skills, reconfigure settings, change its own behavior. That’s powerful. It also means things can occasionally go sideways in ways that are hard to manually untangle. A daily snapshot means you’re never more than 24 hours away from a clean restore point.
Step 4: Install Docker Manager on Your VPS
Docker is what actually runs OpenClaw behind the scenes. Without getting too technical — Docker creates isolated environments called containers. Each container runs independently without interfering with anything else on the server. It’s the reason the one-click install is even possible.
In your hPanel, find Docker Manager in the left sidebar.
- If you ticked the Docker Manager option during setup, it’s already installed. Click in and confirm it shows a Running status.
- If it’s not installed yet, click Install and give it 2–3 minutes.
- Once Docker Manager is running, click into the Catalog tab — that’s where you’ll find OpenClaw in the next step.
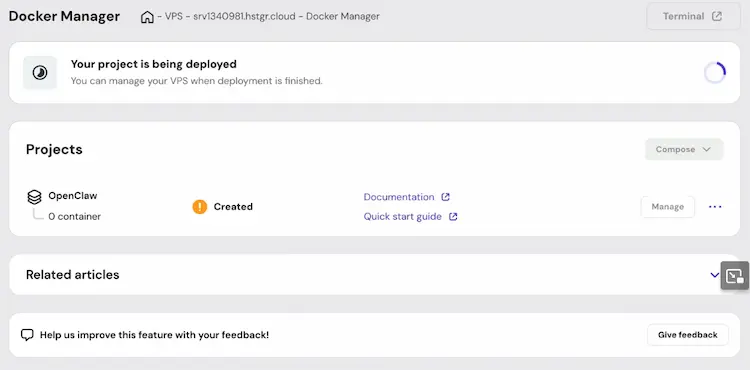
Step 5: Deploy OpenClaw from the Docker Catalog
This is the step I was most nervous about. It turned out to be the easiest one.
Inside Docker Manager, go to Catalog and search for OpenClaw. Click Install.
A form will pop up asking for environment variables. That sounds complicated — it’s basically just a settings page. Here’s what to fill in:
- OPENCLAW_GATEWAY_TOKEN — Auto-filled by the system. Do not edit it. Do, however, copy it right now and paste it somewhere safe. Your notes app, your password manager — anywhere. Don’t close this screen without saving that token. It’s the only key to your dashboard.
- API Keys (OpenAI / Anthropic / Gemini / xAI) — If you have your own API keys, paste them in the corresponding fields. If you went with Nexos AI credits, leave these blank.
- WHATSAPP_NUMBER — Enter your number if WhatsApp is your preferred channel. You can also skip this and configure it later.
Once your gateway token is saved, click Deploy. This deployment phase of the Hostinger OpenClaw setup takes 2–5 minutes. When the status indicator flips to a green Running status, you’re good to move on.
HALFWAY THERE — NEED THE PLAN FIRST?
Get the Hostinger KVM 2 VPS — OpenClaw Ready
The OpenClaw template is pre-configured. Pick your plan, check out, and follow these steps. Everything from Step 1 to Step 8 works exactly as described here — I completed this setup myself before writing this guide.
Plans from $5/month · 30-day money-back guarantee · No coding required
→ Get Started with Hostinger OpenClaw VPS30-day money-back guarantee · Plans from $5/month
Step 6: Connect an AI Model With Your API Key
OpenClaw is the shell. The AI model is the brain inside it. Right now your assistant is running but has nothing to think with. You need to connect it to an AI provider using an API key.
If you bought Nexos AI credits: Skip this step entirely. Your AI access is already linked through your Hostinger account.
If you’re using your own API key (OpenAI example):
- Go to platform.openai.com and log in.
- Navigate to API Keys in the left sidebar.
- Click Create new secret key. Give it a name — I called mine “OpenClaw VPS.”
- Copy the key immediately. You will not see it again after closing the screen.
- Back in Hostinger’s Docker Manager, open your OpenClaw project settings and paste the key into the OPENAI_API_KEY field.
- Restart the OpenClaw container to apply the change.
Getting an Anthropic or Gemini key works the same way — each provider has their own dashboard, but the process is nearly identical.
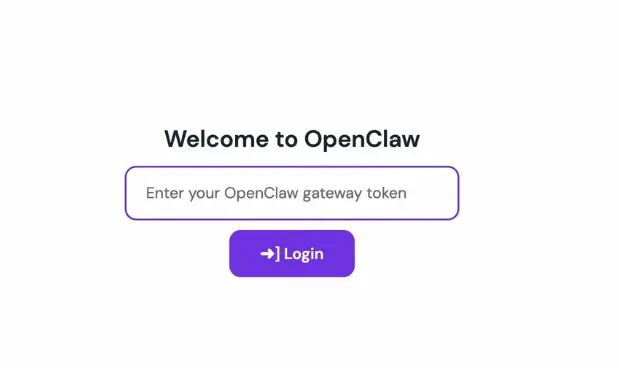
Step 7: Access the OpenClaw Dashboard With Your Gateway Token
If you saved your gateway token back in Step 5, this part is fast.
In Docker Manager, find your OpenClaw project and click the Open link — usually a purple link in the lower left of the project tile. This takes you to your OpenClaw dashboard, which runs at your VPS’s IP address on port 18789.
Paste your saved token into the login field and click Authenticate.
If you lost your token, open the browser-based terminal in hPanel and run:
cat ~/.clawdbot/.env | grep CLAWDBOT_GATEWAY_TOKENThe token will appear in the output. The “clawdbot” naming in the files is just the old name from before the rebrand — everything works fine, don’t let it throw you off.
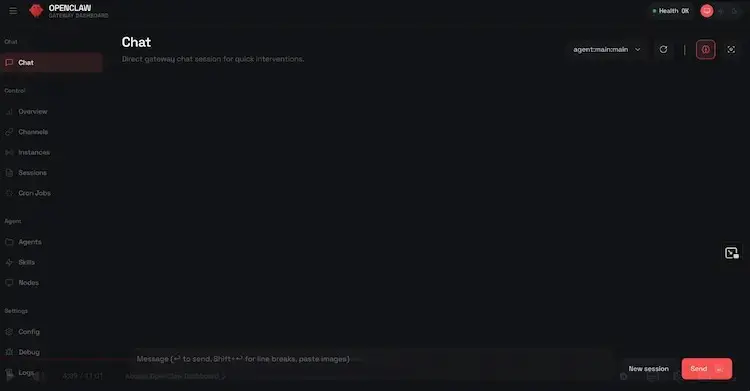
Once inside the dashboard, confirm the system shows a Healthy status. OpenClaw will then run you through a short onboarding interview — your assistant’s name, communication preferences, a bit of personalization. Takes about 2 minutes. Do it properly; it shapes how your assistant behaves day to day.
Step 8: Connect Telegram or WhatsApp
You’ve got a running AI assistant. Now give it a way to hear from you.
Connecting Telegram
- Open Telegram and search for @BotFather.
- Send the message
/newbotand follow the prompts to name your bot and create a username. - BotFather gives you an API token at the end — copy it.
- In your OpenClaw dashboard, go to Channels → Telegram.
- Paste the token and click Connect.
- Open your new bot in Telegram and send “Hi.” OpenClaw will respond with a short setup conversation.
Connecting WhatsApp
- In your OpenClaw dashboard, go to Channels → WhatsApp.
- A QR code appears on screen.
- On your phone, open WhatsApp → Settings → Linked Devices → Link a Device and scan the QR code.
- Send a test message — your assistant should respond within seconds.
That’s it. Your Hostinger OpenClaw setup is complete — the assistant is live on your VPS, online 24/7, responding to your messages whether you’re at your desk or somewhere without your laptop.
Three Mistakes I See Beginners Make
After going through the Hostinger OpenClaw setup process myself and watching a few other people attempt it, three mistakes come up every single time.
Frequently Asked Questions
What is OpenClaw and how does it actually work?
OpenClaw is a self-hosted AI assistant platform — formerly known as Moltbot and Clawdbot — that runs on your own server. It connects to AI models like OpenAI’s GPT or Anthropic’s Claude and lets you interact with that AI through messaging apps like Telegram and WhatsApp. Because it runs on a VPS, it stays active around the clock regardless of whether your personal devices are on.
Do I need any coding experience to set up OpenClaw on Hostinger?
No. The Hostinger OpenClaw setup uses a one-click Docker template that handles the server-side configuration automatically. You fill in a few fields in a web form, click Deploy, and the platform handles the technical work. This guide was written specifically for people with no server or coding background — the entire setup takes under 30 minutes.
What is the cheapest Hostinger plan that can run OpenClaw properly?
The KVM 2 plan is the minimum recommended configuration, running at approximately $5–9 per month depending on billing period. It provides enough CPU and memory to run OpenClaw’s Docker containers reliably for personal use, including multiple connected messaging channels like Telegram and WhatsApp simultaneously.
How do I recover my OpenClaw gateway token if I lose it?
Open the browser-based terminal in hPanel and run: cat ~/.clawdbot/.env | grep CLAWDBOT_GATEWAY_TOKEN — the token will appear in the output. The config files use the legacy “clawdbot” naming from before the rebrand, but everything functions normally. Always save the token to a password manager immediately after deployment to avoid this situation.
Can OpenClaw connect to Telegram and WhatsApp at the same time?
Yes. OpenClaw supports simultaneous connections to multiple channels — including Telegram, WhatsApp, Slack, Discord, Google Chat, Signal, iMessage, and Microsoft Teams. All active channels are managed from the Channels section in your OpenClaw dashboard after deployment.
📧 Want the Setup Checklist PDF?
I put together a one-page PDF that condenses every step in this guide into a quick reference — including the exact fields to fill in during deployment and the terminal command for recovering a lost gateway token. Subscribe to the Tryamba newsletter and I’ll send it straight to your inbox.
No sequences. No sales emails. Just the checklist — and my weekly notes on tools I actually use.
→ Send Me the Checklist — It’s FreeWhat You Should Do Right Now
You’ve covered everything: choosing the right plan, deploying the template, connecting an AI model, and linking your first messaging channel. The Hostinger OpenClaw setup is genuinely one of the more accessible self-hosted AI configurations I have tested — and I’ve tried a few that were far more painful.
The one thing that catches people out every time isn’t a technical problem. It’s hesitation. The setup looks intimidating from the outside and turns out to be straightforward once you actually start.
So here’s your first action: click the link below, land on Hostinger’s OpenClaw VPS page, and grab the KVM 2 plan. You can have your assistant live and responding to your first message in under 30 minutes.
Plans from $5/month · One-click OpenClaw template · 30-day money-back guarantee · Verified May 2026