You Are Already Closer Than You Think
If you have ever thought “I want to start a blog but I have no idea where to begin” — this guide was written exactly for you.
After 4+ years of running Tryamba and helping thousands of beginners launch their first blog, I can tell you this with certainty: starting a blog in 2026 is genuinely simple. Every single step is doable by any normal person — with zero technical background.
This guide walks you through every click, every screen, and every decision. I use Hostinger as the recommended host throughout — beginner-friendly, free domain included, and starting from just $1.99/month. But I also give you honest alternatives so you can decide what is right for you.
Let us get your blog live today.
What You Will Need (Seriously, Not Much)
Keep this list minimal — I do not want you overwhelmed before Step 1:
- A laptop or desktop computer — mobile works, but a laptop is easier for this setup
- A credit or debit card — Hostinger starts at $1.99/month. Less than one cup of coffee.
- 15 to 20 minutes of quiet time — silence your phone and follow each step in order
- A rough blog topic — food, travel, finance, parenting, marketing — anything you care about
- A blog name idea — short and memorable. We will cover choosing this in Step 1.
That is the entire list. No coding. No design skills. No technical experience. If you can send a WhatsApp message, you can build a blog today.
What You Will Have by the End of This Guide
Here is your finish line — so you know exactly what we are building before we start:
- A live blog with a real domain name (e.g., yourblogname.com)
- Fast, secure hosting with free SSL — your blog will be safe and trusted by Google
- WordPress installed and ready — the world’s most popular blogging platform
- A clean professional theme applied and 4 essential plugins installed
- Your niche chosen, your first post published, and a content plan in place
Step 1: Choose Your Blog Niche and Domain Name
Part A — Choose Your Niche First
Most beginners skip straight to buying hosting and only think about their niche later. That is a mistake. Your niche — the specific topic your blog focuses on — determines everything: your audience, your content ideas, and your income potential.
The most common niche mistake is going too broad. A “general lifestyle blog” attracts nobody in particular. The more specific your niche, the faster you build a loyal, trusting audience.
3 questions to find your niche right now:
- What topic could you write 50 articles about without running out of ideas?
- Is there an audience that needs help with this topic? (Google it quickly to check)
- Is there a way to eventually earn from this niche through products, services, or affiliate links?
🤖 Pro Tips: Type into ChatGPT or Gemini: “I am interested in [topic]. Suggest 10 specific niche angles a beginner blogger could own in 2026.” Use the ideas as inspiration, then write everything in your own voice and experience. Google’s Helpful Content system rewards human authenticity.
Part B — Choose Your Domain Name
Your domain name is your blog’s address on the internet — like tryamba.com. Think of it like your blog’s home address. It needs to be easy to remember, easy to type, and relevant to your niche.
The great news: Hostinger includes a free domain for the first year with all annual plans. So you do not need to purchase one separately.
3 quick rules:
- Keep it short — 1 to 3 words. Short names are easier to share, remember, and brand.
- Avoid numbers and hyphens — ‘best-blog-tips.com’ is harder to say aloud than ‘bestblogtips.com’.
- Use .com if possible — the most recognised extension worldwide. If your .com is taken, .net or a niche extension works too.
💡Still stuck on a name? Type your niche + a descriptor into ChatGPT and ask for 20 domain name ideas under 15 characters. Then check availability at Hostinger during checkout. Done in 2 minutes.
Step 2: Choose and Buy Your Hosting Plan
Hosting is the service that stores your blog’s files and keeps your website available to visitors 24/7. Think of it like renting an apartment for your blog — your content lives there, and hosting makes sure the door is always open.
Your hosting choice directly impacts your Google rankings, your page load speed, and your Google Ads revenue. A slow or unreliable host means slower rankings and lower ad earnings. This is the most important decision in this entire guide.
My Top Recommendation: Hostinger
I recommend Hostinger for most new bloggers in 2026 for these specific reasons:
- Free domain name for the first year — saves you $12–$15 upfront
- Free SSL certificate — the padlock icon that signals security to visitors and Google
- One-click WordPress installation — no technical setup whatsoever
- AI website builder — builds a starter design for you by answering a few questions
- Beginner-friendly hPanel dashboard — the cleanest hosting control panel I have used
- Free website migration — if you have a blog elsewhere, they move it for you free
- 24/7 live chat support — real humans, available around the clock
- 30-day money-back guarantee — full refund if you are not satisfied, no questions
Why I Still Recommend It Despite the Renewal Price
Yes, the renewal prices are higher. But here is the honest calculation: even at renewal, Hostinger Business at $16.99/month gives you daily backups, a free CDN, unlimited websites, and premium support — comparable to what competitors charge $25–$35/month for. The introductory period also gives you 12–48 months to grow your blog before paying renewal rates.
You can also read my Honest Hostinger Review 2026: What Nobody Tells You
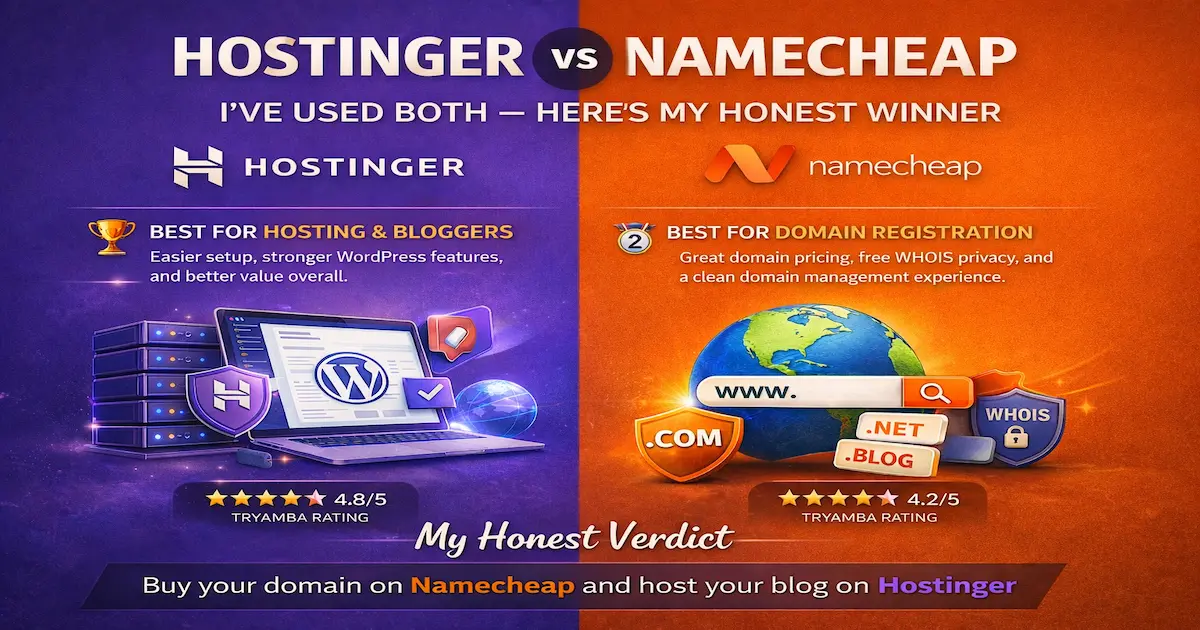
Honest Alternatives (If Hostinger Is Not Right for You)
I recommend Hostinger for most beginners — but every blogger’s situation is different. Here is an honest look at the full landscape:
My honest take on alternatives: Namecheap is the best option if you want the absolute lowest combined domain + hosting cost. Namehero is excellent if your audience is primarily in the US or Europe, and server location matters to you.
How to sign up for Hostinger:
- Go to Hostinger.com and click Get Started
- Select Web Hosting, then choose Premium or Business plan
- Select your billing period — 12, 24, or 48 months. Longer terms = lower monthly price.
- Enter your desired domain name in the free domain field and check availability
- Complete checkout. A confirmation email with login details arrives within minutes.
👉 Start Your Blog with Hostinger (Free Domain Included)
Step 3: Activate Your Free Domain
After your Hostinger purchase is complete, your free domain needs to be activated once inside your dashboard. This takes about 60 seconds, and Hostinger automatically connects it to your hosting.
- Log in to hpanel.hostinger.com with your new account details
- From the main dashboard, click the Claim Domain button
- Type your chosen domain name in the search box and click Search
- Select your .com (or preferred extension) and click Continue
- Fill in your registration details and click Register Domain
- Done. Hostinger automatically connects your domain to your hosting — no DNS settings required.
💡Hostinger sets up all nameservers and DNS records automatically when you register through their panel. You do not need to touch any technical settings. Everything connects in the background within minutes.
Step 4: Install WordPress — Two Clicks
“This is the part most people think is complicated. It is not. It literally takes two clicks.”
WordPress is the software that powers your blog — think of it like the operating system of a smartphone. It is what lets you write posts, upload images, manage your design, and run your entire blog without touching a single line of code.
Over 43% of all websites on the internet run on WordPress. It is free, endlessly powerful, and trusted by everyone from hobby bloggers to global news outlets.
How to install WordPress through Hostinger:
- From hPanel, click Websites in the top navigation menu
- Click Add Website, then select WordPress
- Choose your domain from the dropdown menu
- Fill in your blog title, admin username, and a strong password. Save these somewhere safe — you will need them every time you log in.
- Click Install. Wait 60 seconds.
✅ Milestone: WordPress is now installed. The entire technical setup is complete. Everything from this point forward is visual, click-based, and designed for non-technical users like you.
Step 5: Log in to Your WordPress Dashboard
Your WordPress dashboard is your blog’s command centre. This is where you write posts, manage your design, install plugins, and control everything. Think of it like the home screen of your phone — all the important stuff starts here.
- Open your browser and go to: yourdomain.com/wp-admin (replace ‘yourdomain’ with your actual domain)
- Enter the username and password you created during installation in Step 4
- Click Log In
You will see the WordPress Dashboard — a clean screen with a dark sidebar on the left. This is your blog’s home. Spend 2 minutes clicking around and getting comfortable before moving to Step 6.
Step 6A: Install a Free Theme
A WordPress theme controls how your blog looks — the layout, fonts, colours, and overall feel. Think of it like choosing the interior design of your blog. The best part: you can change it any time without losing a single word of your content.
My top 3 free theme recommendations for new bloggers in 2026:
- Astra — ultra-lightweight, incredibly fast, and used by over 2 million websites worldwide. Best all-rounder.
- Kadence — beautiful starter designs out of the box. Perfect for lifestyle, food, or personal blogs.
- GeneratePress — minimalist and blazing fast. Ideal if you want simplicity and the best possible page speed scores.
How to install your theme:
- In your WordPress Dashboard, click Appearance in the left sidebar
- Click Themes, then Add New Theme
- Search for Astra (or your preferred theme)
- Hover over it and click Install, then Activate
Step 6B: Install These 4 Essential Plugins (Do This Before Your First Post)
This is the step most beginner guides skip — and it is one of the most important. Plugins are free apps for your WordPress blog. They add features without any coding. There are 4 you absolutely need to install before you write your first post.
| Plugin | Type | Why You Need It |
|---|---|---|
| Rank Math SEO | SEO | Tells Google what your posts are about. Install before writing anything. |
| Wordfence Security | Security | Protects your blog from hackers and malware. Free and essential. |
| WP Super Cache | Speed | Makes your blog load faster by caching pages. Free and easy to set up. |
| UpdraftPlus | Backups | Adds extra backup protection on top of what Hostinger already provides. |
How to install any plugin:
- In your WordPress Dashboard, click Plugins in the left sidebar
- Click Add New Plugin
- Type the plugin name in the search bar (e.g., Rank Math)
- Click Install Now then Activate
- Repeat for all 4 plugins above
💡Set up Rank Math SEO immediately after installing it — it walks you through a simple wizard that configures your blog for Google in about 3 minutes. This one step significantly improves how quickly Google finds and indexes your content.
Step 7: Write and Publish Your First Blog Post
This is the moment your blog goes from a setup project to a real, live publication. Take a breath — this part is actually the most enjoyable step in the whole guide.
What Should Your First Post Be About?
A common beginner mistake is waiting to publish until the post is “perfect”. Your first post will never be perfect — and that is completely fine. Here are 3 solid ideas:
- An introduction post — “Who I Am and Why I Started This Blog”. Simple, personal, and authentic.
- A list post — “5 Things I Wish I Knew About [Your Niche Topic] When I Started”. Easy to write, useful to readers.
- A how-to guide — “How to [Do Something in Your Niche] as a Complete Beginner”. Beginner guides always rank well.
🤖 Pro Tips: Stuck on what to write? Type this into any AI tool: “I am starting a blog about [your niche]. Give me 20 beginner-friendly blog post ideas with search intent in mind for 2026.” Then pick the one that excites you most and write it entirely in your own words.
How to Publish Your First Post in WordPress
- From your Dashboard, click Posts in the left sidebar, then Add New Post
- Click Add title and type your post title
- Click in the white area below — this is the Block Editor. Think of it like LEGO pieces for your content.
- Click the + button to add blocks: Paragraph for text, Heading for sections, Image for photos
- Write your post. 500–800 words is a great target for your first article.
- Before publishing, scroll down to the Rank Math SEO panel and fill in your Focus Keyword and SEO description. This takes 2 minutes and helps Google understand your post.
- Click the Publish button in the top right, then confirm by clicking Publish again
✅ Milestone: Your blog is officially live on the internet. Open a new browser tab, type your domain name, and see your blog for real. You just built and launched a website from scratch.
What to Do Right After Your Blog Goes Live
Your blog is live. Here are the 5 most important actions in the next 24 hours:
- Submit to Google Search Console — Go to search.google.com/search-console, add your domain, and submit your sitemap (yoursite.com/sitemap_index.xml). This tells Google your blog exists and helps it get indexed faster.
- Connect Google Analytics — Go to analytics.google.com, create a free account, and connect it to your blog through Rank Math. This shows you exactly how many people are reading and where they come from.
- Write your About page — Go to Pages > Add New and create a short About page. Tell readers who you are, what your blog covers, and who it is for. This builds trust with every new visitor.
- Plan your first 10 blog posts — Write down 10 article ideas right now while the momentum is high. Aim to publish 2 posts per week for the first month. Consistency in the first 90 days is the single biggest predictor of success.
📬 Free Blogger Checklist — 10 Things to Do in Your First 7 Days
Subscribe to the Tryamba newsletter and I will send it straight to your inbox. No spam, ever.
[ Yes — Send Me the Free Checklist ]
How to Make Money From Your New Blog
Your blog is live. The natural next question: how do I actually earn from this? A WordPress blog is one of the most flexible income platforms in 2026. Here are the four main paths:
1. Affiliate Marketing — The Fastest Path for New Bloggers
Recommend products and services inside your articles and earn a commission when readers click your link and purchase. No inventory. No customer service. No startup cost. This is how Tryamba earns income — and it is where I recommend every new blogger starts.
2. Google AdSense and Display Ads
Once you have 20–30 published articles and consistent traffic, apply for Google AdSense. Every visitor who sees or clicks a display ad earns you money. Higher traffic = higher monthly ad revenue.
3. Sponsored Posts
Once your blog builds an audience, brands will pay you to feature their products in your content. Income ranges from $50 to several thousand per post depending on your readership and niche.
4. Digital Products
Ebooks, templates, checklists, and mini-courses. Created once, sold indefinitely. The most scalable income path — typically developed after 6–12 months of consistent publishing.
I cover all four methods in full detail on Tryamba:
- How to Make Money Online From Home — The Tryamba 2026 Guide
- Fiverr Affiliate Program for Beginners: Earn Your First $100 Commission
- Best Web Hosting for New Bloggers 2026
6 Mistakes New Bloggers Make in Their First Month
I have made every one of these. Please learn from my experience:
- Choosing a niche that is too broad — “Lifestyle blog” attracts nobody specific. The narrower your focus, the faster you build trust and an audience. “Budget meal prep for university students in Dhaka” beats “food blog” every time.
- Spending weeks on design before publishing — Your blog grows through content — not colour schemes or logo tweaks. Publish your first 10 posts before touching any design settings. Launch ugly, improve later.
- Using AI to write entire articles — By 2026, Google’s Helpful Content system specifically rewards content written from personal experience. Use AI for ideas, outlines, and brainstorming — then write everything in your own voice. AI-generated articles without human input rarely rank.
- Not installing an SEO plugin before the first post — Every post published without Rank Math or Yoast is a missed chance to signal Google what your content is about. Install Rank Math in Step 6B — before you write anything.
- Ignoring mobile view — Over 60% of internet traffic in 2026 comes from phones. After every post, check how it looks on your phone. If it is hard to read or navigate, your readers will bounce.
- Buying hosting only on intro price without checking renewals — The $1.99 intro rate is real — but Hostinger’s Business plan renews at $16.99/month. This is not a scam — it is standard industry practice. Just read the renewal terms at checkout and choose a longer billing term to lock in the lower rate.
Frequently Asked Questions
How much does it cost to start a blog in 2026?
Starting a blog costs between $24–$48 for your first year using Hostinger’s annual plans — that covers both hosting and your free domain.
Can I start a blog for free?
Free platforms like WordPress.com, Blogger, and Wix exist — but they come with serious limitations. No custom plugins, no affiliate marketing, limited design control, and the platform places its own ads on your site.
How long does it take to set up a blog from scratch?
Following this guide step by step, most complete beginners have their blog live in 15 to 25 minutes. The technical steps take under 10 minutes total. The additional time usually goes into choosing a niche, domain name, and first post topic.
What is the best hosting for a beginner blog in 2026?
Hostinger is my top recommendation for new bloggers in 2026. The free domain, beginner-friendly hPanel, AI website builder, one-click WordPress installer, and 30-day money-back guarantee make it the most accessible starting point available.
How do I use AI tools for my blog without getting penalised by Google?
Use AI as a co-pilot — not a ghostwriter. Let AI help you brainstorm topics, create outlines, suggest headings, and check grammar. Then write the actual content yourself using your personal experience, opinions, and examples.
Can I start a blog and make money from any country in 2026?
Yes — blogging income is genuinely location-independent in 2026. Google AdSense, affiliate programs like Semrush, Fiverr, and Hostinger, and digital product sales all pay internationally via Payoneer, PayPal, Wise, or bank wire transfer.
Does Hostinger include a free domain with all plans?
Yes — Hostinger includes a free domain for the first year with all annual Premium, Business, and Cloud hosting plans. After year one, domain renewal is approximately $15–$20 per year for a .com.
Final Verdict: Start Today — Not Tomorrow
You now have everything you need. The steps are clear. The technology is beginner-friendly. The cost is lower than a monthly Netflix subscription.
Hostinger makes the starting point easier than ever — free domain, one-click WordPress, daily backups on the Business plan, and a 30-day money-back guarantee so there is zero financial risk to getting started today.
And here is the truth I want to leave you with: every successful blogger you admire was once exactly where you are right now. No audience. No experience. A blank screen. The only difference between them and someone who never started is that they published their first imperfect post and kept going.
Start imperfect. Publish consistently. Improve as you go. That is the entire formula. There is nothing else.
👉 Start Your Blog with Hostinger today.